Fun Polka Dot Top with Flamingos - Adding the Sleeve Edging


Creating a fun polka dot top with added flamingos shown here.

Fun Polka Dot Top with Added Flamingos


I will show you how I created this fun top which was just a left over from a dress in which I had used the bottom skirt portion and sleeves for another project. In this post I will show you how I added the flamingo sleeve edging to the armhole of the top.


Original polka dot top that I will be working with.

Original Left Over Fabric From Dress

Here is the original left over piece of material from previous dress. The sleeve openings need to be finished and the bottom portion needs to be trimmed to make a symmetrical look and then finished with a hem. The top is too short for my taste so I will attach a fun material by gathering it at the midline seam. First, let's start with finishing the sleeve openings.


Polka dot top with finished Flamingo sleeve opening.

Finishing the Sleeve Openings

Here is the finished sleeve opening. I cut two strips of this fun fabric on a diagonal. I made it long enough to go around the entire armhole opening and wide enough to sew to armhole then fold over to the inside of garment to create a nice finish. See pics below for details on adding sleeve edge.


Instructions on how to measure and cut sleeve opening edging fabric on top of flamingo fabric.
Instructions listed on how to measure sleeve opening with pink polka dot top showing.

Measure for Sleeve Opening

Here we are measuring the entire length of the sleeve opening from front to back. We need to add 1/2 inch to this measurement to bring it together at the bottom of the sleeve opening or armhole.

Sleeve Opening Fabric Edging

Cut two (one for each armhole) diagonal strips 2 3/4 inches wide by the measurement of your sleeve opening, plus adding an additional 1/2 inch for seam allowance at the bottom of your sleeve. Cutting on the diagonal allows for a smooth edging that contours the opening better than fabric cut along the grain.

Cut out your edging fabric and we will be ready to pin and sew to our top.


Instructions on pinning fabric edging to sleeve opening on polka dot top with flamingo fabric edging.
Instructions and pic on how to pin around entire sleeve opening of polka dot top fabric and flamingo fabric edging.

Pinning Fabric Edging to Sleeve Opening

First, reinforce sleeve opening by sewing a stay stitch all around the armhole or sleeve opening. This will help your opening not to stretch out. Next, with right-sides together, pin the cut fabric edging to the sleeve opening, starting at the bottom seam of the armhole opening. Fold up 1/4 inch seam allowance fabric at bottom of armhole as seen in above pic. Pin around entire sleeve opening but continue across armhole seam 1/4 inch at bottom, back where you started.

Instructions on how to start and finish flamingo fabric at bottom of armhole seam.Instructions on how to top stitch seam on flamingo fabric at armhole seam.

Start and Finish Edges at Bottom of Armhole Seam

For your seam at the bottom of the armhole, make sure the start and finish 1/4 inch seam allowance edges meet up and align nicely. Turn right-side out to make sure it is lined up after pinning and then flip it back to sew. We will sew the fabric edging seam down once we have sewn around the entire armhole (pic below). You can also sew the start and finish 1/4 inch edgings with right-sides together before you sew around the armhole if you like. Either way will work.


Instructions on sewing sleeve edging fabric to top.

Sew Sleeve Edging Fabric to Top

Now we can sew the entire sleeve edging to the top. I used a 3/8 inch seam allowance as seen in picture. Remove pins one by one before you reach them while sewing.


Instructions on turning right-side of fabric out and pressing with an iron.

Turn Right-side Out and Press with Iron

The sleeve edging is beginning to look very nice.


Instructions on how to fold and turn sleeve edging to inside.
Instructions and measurements on how to fold sleeve edging toward inside of top.


Fold and Turn Sleeve Edging to Inside

Turn top inside out. Fold sleeve edging up at 1 inch from the front seam that you just sewed. Tuck under another 3/8 inch for a nice finish. Pin in place next to the seam you just sewed. Now we are ready to turn our top right-side out and sew.


Instructions and picture of me sewing a top stitch on the sleeve edging.

Top Stitch

Turn top right-side out and top stitch 1/8 inch from seam edge. Be sure to check that the inside of your edging is being secured as you sew. I remove each pin as I come to it before sewing over that area of fabric.


Picture on polka dot top with finished flamingo sleeve edging.

Finished Sleeve Edging

Here is the finished flamingo fabric sleeve edging nicely pressed. It's a fun way to finish off this top's armholes and incorporate the flamingo fabric to complement the ruffled skirt of the top so nicely.

Check out how I add the skirt to this top in my upcoming post: Fun Polka Dot Top with Flamingos - Adding the Skirt.


Flamingo fabric shown and how I had fun finding the right fabric for this project.

Finding the Fun Flamingos

It was so much fun to pick out the perfect fabric to complement the fun polka dots on this top. I took my salvaged top to Joann Fabrics to find something that would go well with this garment. This was another step in this project that was satisfying to do and accomplish - hunting for that perfect print.

What left over garment might you have that you want to be creative with?

Loving the process and enjoying the product,
Linda😊

Zebra Print Sun Umbrella - Reinforcing A Sun Umbrella with a Fun Zebra Print


Zebra print fabric used to reinforce original sun umbrella.

Zebra Print Sun Umbrella

Here is my new reinforced zebra print sun umbrella. I wanted to fix this particular umbrella instead of buying a new one because this fixture tilts to block the sun; a feature which I love about it. So I decided to use some fun zebra print material that I had to cover the areas that are getting thin and beginning to tear.

A patio umbrella that has begun to tear.
Umbrella Fabric with Tears
Here you can see the original patio umbrella fabric that has the beginning of some tears in it. I used iron on interfacing to reinforce the torn areas.


Interfacing used on tears shown on original umbrella fabric.
Interfacing Used on Tears
Here you can see the iron on interfacing used to reinforce the umbrella fabric.

Zebra print shower curtain material positioned on floor

Zebra Print Shower Curtain Material

Here is the zebra print material that I decided to use to cover the areas of the patio umbrella that are tearing. There wasn't enough material to create a new cover so I decided to use the four corners of the material to create a diagonal cut to cover each of the six sections of the umbrella. Since I only have four corners I used the left over material to construct two more similar cuts.


Zebra material pieced together on umbrella

Zebra Material Pieced Together on Umbrella


Instructions shown on zebra print umbrella for cutting out the shape of the diagonal pieces.

Cutting Out the Shape of the Diagonal Pieces

 I took one corner of the zebra fabric and placed it diagonally on one of the six sections of the umbrella. I placed the point of the corner at the edge of the umbrella in the middle of the section of the triangle (see picture above). Then I cut the fabric on the edges of the triangle adding an extra 5/8 inch of material for seam allowance (see picture above). I did this four times. With the material I had left over I created two more corner pieces. I used one of the original corner pieces as a pattern to create the last two pieces. Then I sewed all the sides together to create the six section cover for the umbrella.

New pieces of the zebra print fabric sewn together and displayed.

Pieces Sewn Together

Here are the pieces sewn together and folded in half.
Open up and place all sewn pieces onto the umbrella. Align all the triangle side seams with the original umbrella fabric side seams which also align with the aluminum extensions.

Instructions on how and where to sew the new fabric on to the original umbrella

Sewing the New Fabric on to the Original Umbrella

I hand stitched the zebra fabric to the original umbrella fabric all around the edge of the zebra fabric. I also hand stitched the two fabrics together around the top circular opening of the umbrella. At the top of the umbrella cut a circular piece of fabric larger than the opening and cover this area. Attach at side seams.


Finished reinforced sun umbrella with zebra print fabric.

Finished Patio Umbrella

Here is my newly reinforced, fun zebra print, sun umbrella that I can tilt when needed. I think I'll go out to the garden now and enjoy!

Linda

Top too Short? Add a Flounce


A red paisley print top with an added beige flounce

Add a Flounce to a Top

I will show you how to add a pre-made flounce to a top. I'm using a pre-made flounce which makes this project easier to do.


A red paisley top that is too short for me to wear.

Adding a Flounce to a Top that's too Short

 This top is shorter than I like to wear, so I'm going to make it longer by adding a flounce to it.


A beige top with a flounce attached

A Pre-made Flounce

Here is a top with a flounce attached. This top does not fit me so I will use this flounce on my other top that does fit.


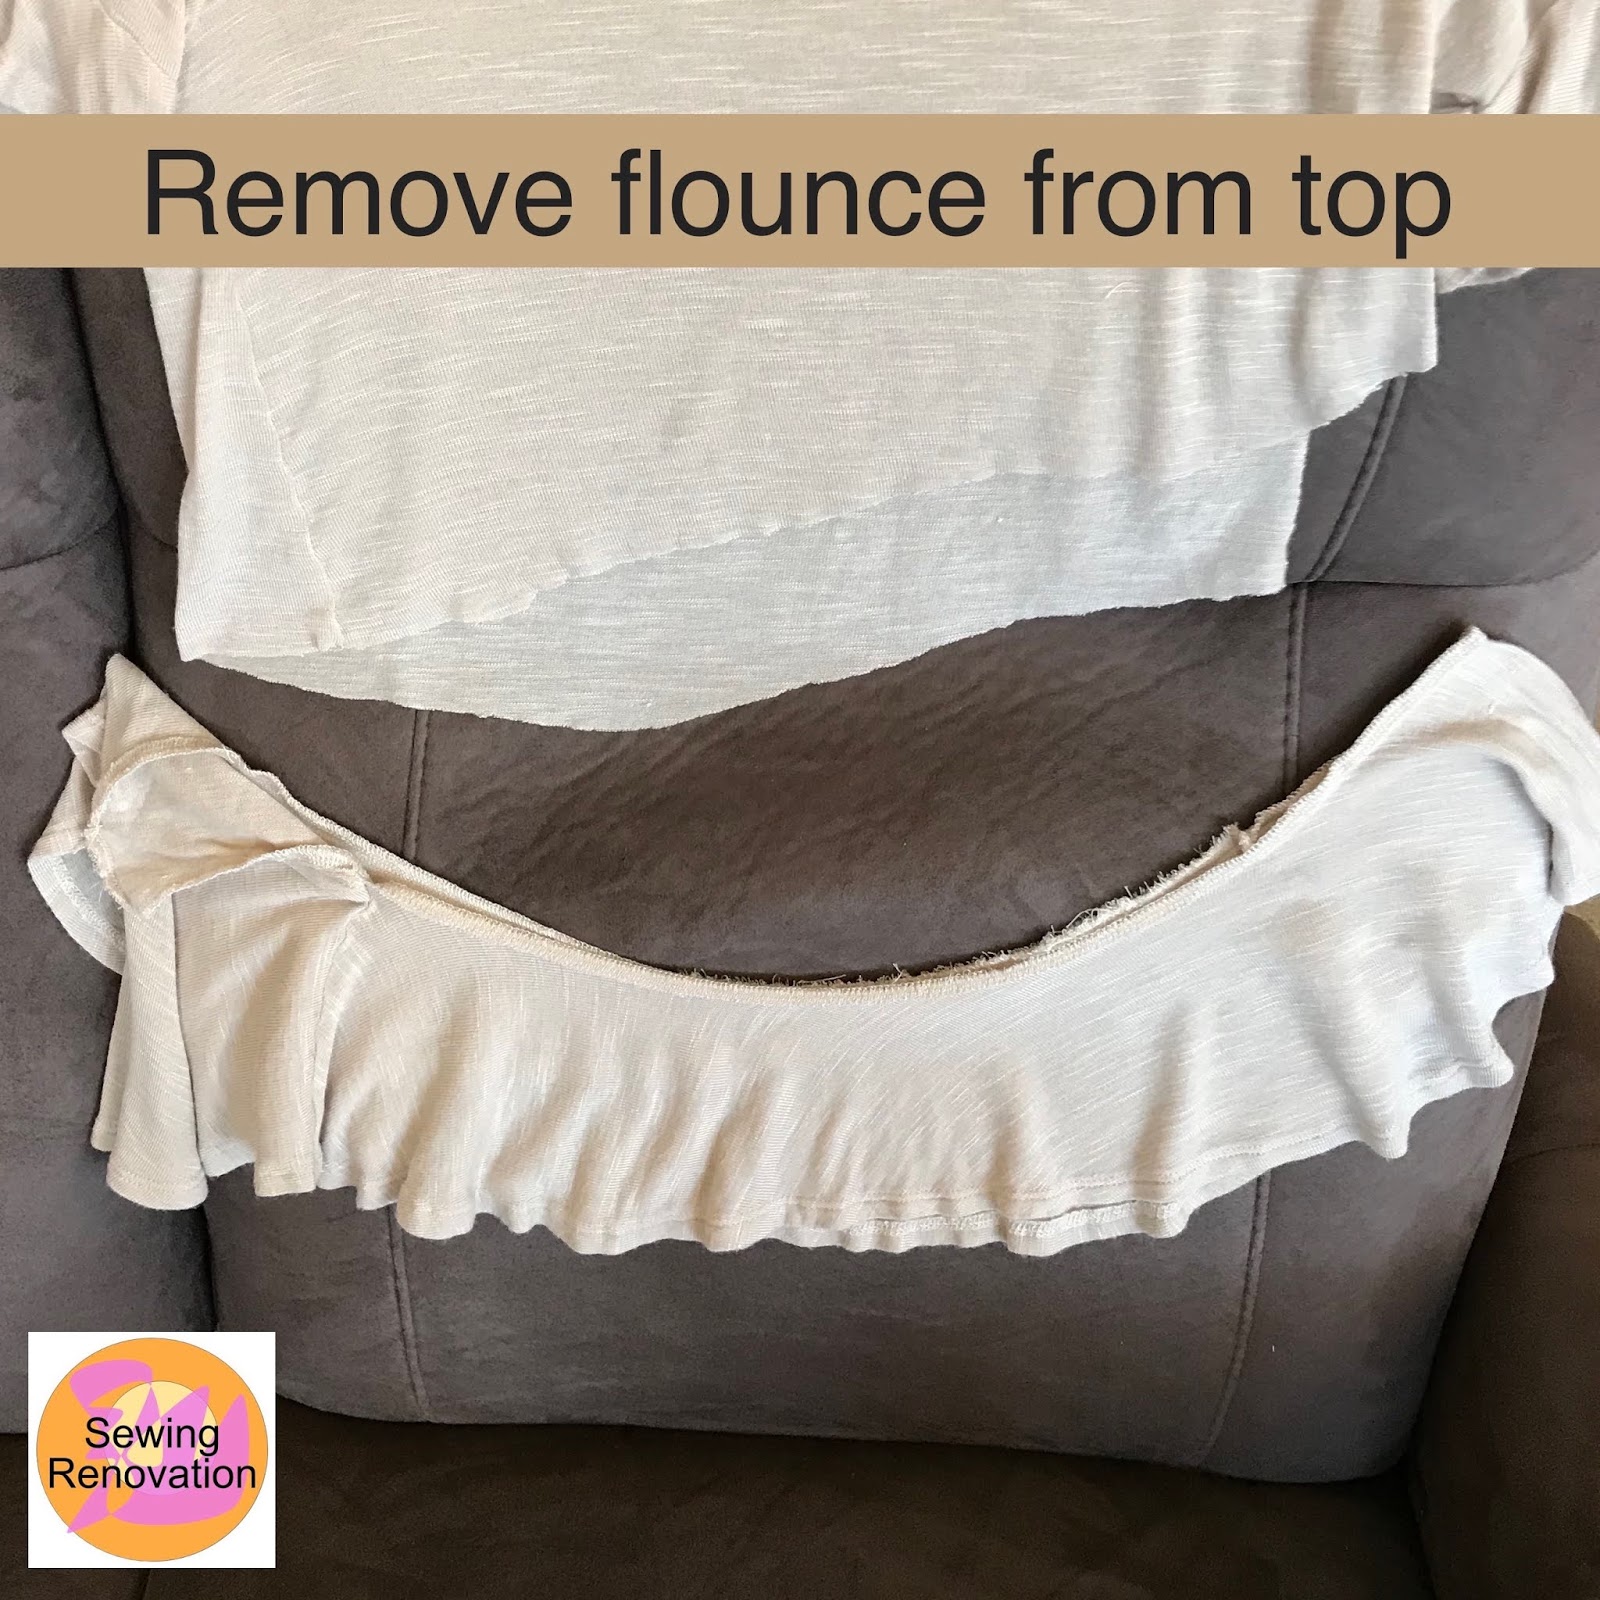
Beige top shown with flounce removed from it and shown below it.

Remove Flounce From Top

Carefully remove flounce from top with a seam ripper.


Beige flounce shown with reinforced inner edge

Flounce with Reinforced Edge

So this pre-made flounce comes with the added benefit of still having this reinforced center edge. I was able to save this edge and attach it to the bottom of my top. If your flounce is not reinforced here you might want to do a simple basting stitch so your material will not stretch too much when you pin it to your top. This pre-made flounce also comes with a hem already in place.


Red paisley top and unattached beige flounce

Top and Flounce


Red paisley top displayed on top of beige circular flounce fully opened

Full Flounce

Here is the full circular flounce opened up. As you can see there is more than you need here. Decide which section of the flounce will work best for your top. I measured how much I needed at the bottom of my top and cut away the edges that were too narrow or too wide.


Flounce Cut to Size

Here is the flounce cut to the correct size for adding to the bottom of your top. I have left some additional material on the edge that is still open to allow for a seam. Now turn your top and flounce inside out.


Red top turned inside out and beige flounce also turned inside out and pinned to bottom of top with arrows pointing to side seam and hem overlap.

Pinning Flounce to Bottom of Top

Top and flounce are turned inside out. The flounce is attached to the bottom of the top. Match side seams of flounce to side seams of top. If you do not have 2 side seams then this is not necessary. You will most likely have one side seam when you bring the flounce edges together. Place flounce edge approximately 1 inch above the hem line of the top. This measurement may vary depending on your top hem line and desired length.


Red paisley top and beige flounce attached and matching at side seams.

Matching Side Seams

Make sure to match up side seams of both the top and the flounce.


Bringing edges of beige flounce together at the red top's side seams

Bringing Together Edges of Flounce

To finish the side seam that is still open, bring edges of flounce together at the top's side seam.


Matching the beige flounce side seam with the red top side seam.

Pin at Side Seam

Pin the top edge of the flounce to the red top's side seam. Now bring the other edge of the flounce to match the same side seam and with right sides of the flounce facing each other pin the flounce together.


Showing how to flare out the side seam of the flounce to keep the shape consistent

Pinning the Flounce Edges Together

Pin the flounce edges together making sure that you have the right sides facing each other. Pin from top of flounce down to the hem seam. Flare out the pins to create the seam line to keep the flounce shape consistent.


Flounce pinned and being sewn on sewing machine

Sew Seam

Sew seam, removing pins before you sew the area.


Completed flounce sideseam.

Completed Seam


Red top and beige flounce pinned together and ready to sew.

Flounce is Pinned and Ready to Sew

Now all the little details are done and you are ready to sew your flounce onto your top. Turn your top right side out.


Red paisley top and beige flounce shown with a ruler for measuring length

Adjusting the Length

Note: My pre-made flounce varied a little from the inner edge of the flounce to the hem of the flounce. After pinning the flounce to the top I used a ruler to see where the length varied and then adjusted the flounce by raising or lowering it at the sewing line.


Sewing red paisley top to beige flounce

Sew

Here is the top and flounce turned right side out. I am sewing on top of the bottom hem seam line of the top. Sew all around the circumference of the top.


Inside view of attached beige flounce to red top.

Attached Flounce

Here is the attached sewn flounce viewed from the inside of the garment.


Red paisley top with beige flounce attached and completed

Finished Flounce!


Completed red paisley top with beige flounce

Completed Top with Flounce

Now my top is not too short anymore and not only has added length, but also added creativity and style with a soft flow to it.

Enjoy, 

🌹Linda

Scarf Too Big? Make Two out of One!

Two pink floral scarves seen side by side, exactly the same.

Making Two Scarves out of One


Original large pink floral and bright pink scarf

Large Pink Floral Scarf

 I find that some of my scarves are a little large in size for me. So why not make two out of one large scarf?


Finding middle of pink floral scarf and cutting it in half.

Cutting Scarf

Find the middle of the scarf by folding it in half and then cut it all the way through from the bottom to the top edge. Now separate the two pieces of scarves. We will now begin to pin the first scarf to get it ready for sewing.


Instruction on how to start creating one of the new scarves

Creating the New Scarf

Take your right side of fabric and fold it over/on top of the left side of fabric. You will have right sides of fabric facing together. The shear floral fabric seen here will be on top of the bright pink fabric seen on the left side.


Pink floral fabric on top of bright pink fabric, pinned together on the side preparing scarf to be sewn.

Pin Raw Edges Together

After folding the fabric to the other side, pin raw edges together and sew.


Scarf edges being sewn on sewing machine

Sew Edge

 Sew pinned edge. Leave open the top and bottom edges of the scarf so you can pull your fabric through and turn it right-side out.


Instructions on how to turn fabric right-side out by putting you arm through the scarf.

Turning Fabric Right-Side Out

Put your arm through the top opening of the scarf, all the way to the other end at the bottom, until your hand is peeking through.


Instructions on graping scarf and pulling hand back through the fabric

Grasp Scarf and Pull Through

Grasp the scarf, as you see here, and then pull your hand and fabric back through to the other end.


Instructions on continuing to pull fabric through to the end

Pull Fabric

Continue pulling fabric through to the end and then your scarf will be right-side out and completed.


Two completed scarves on a decoration ladder

Completed Scarves

Two completed scarves displayed on a decorative ladder

Now, what will you do with the extra scarf?

Enjoy,
Linda

Creative Sewing Renovation Ideas