Showing posts with label Easy Projects. Show all posts

Adding an Inverted Pleat to a Top that's too Wide

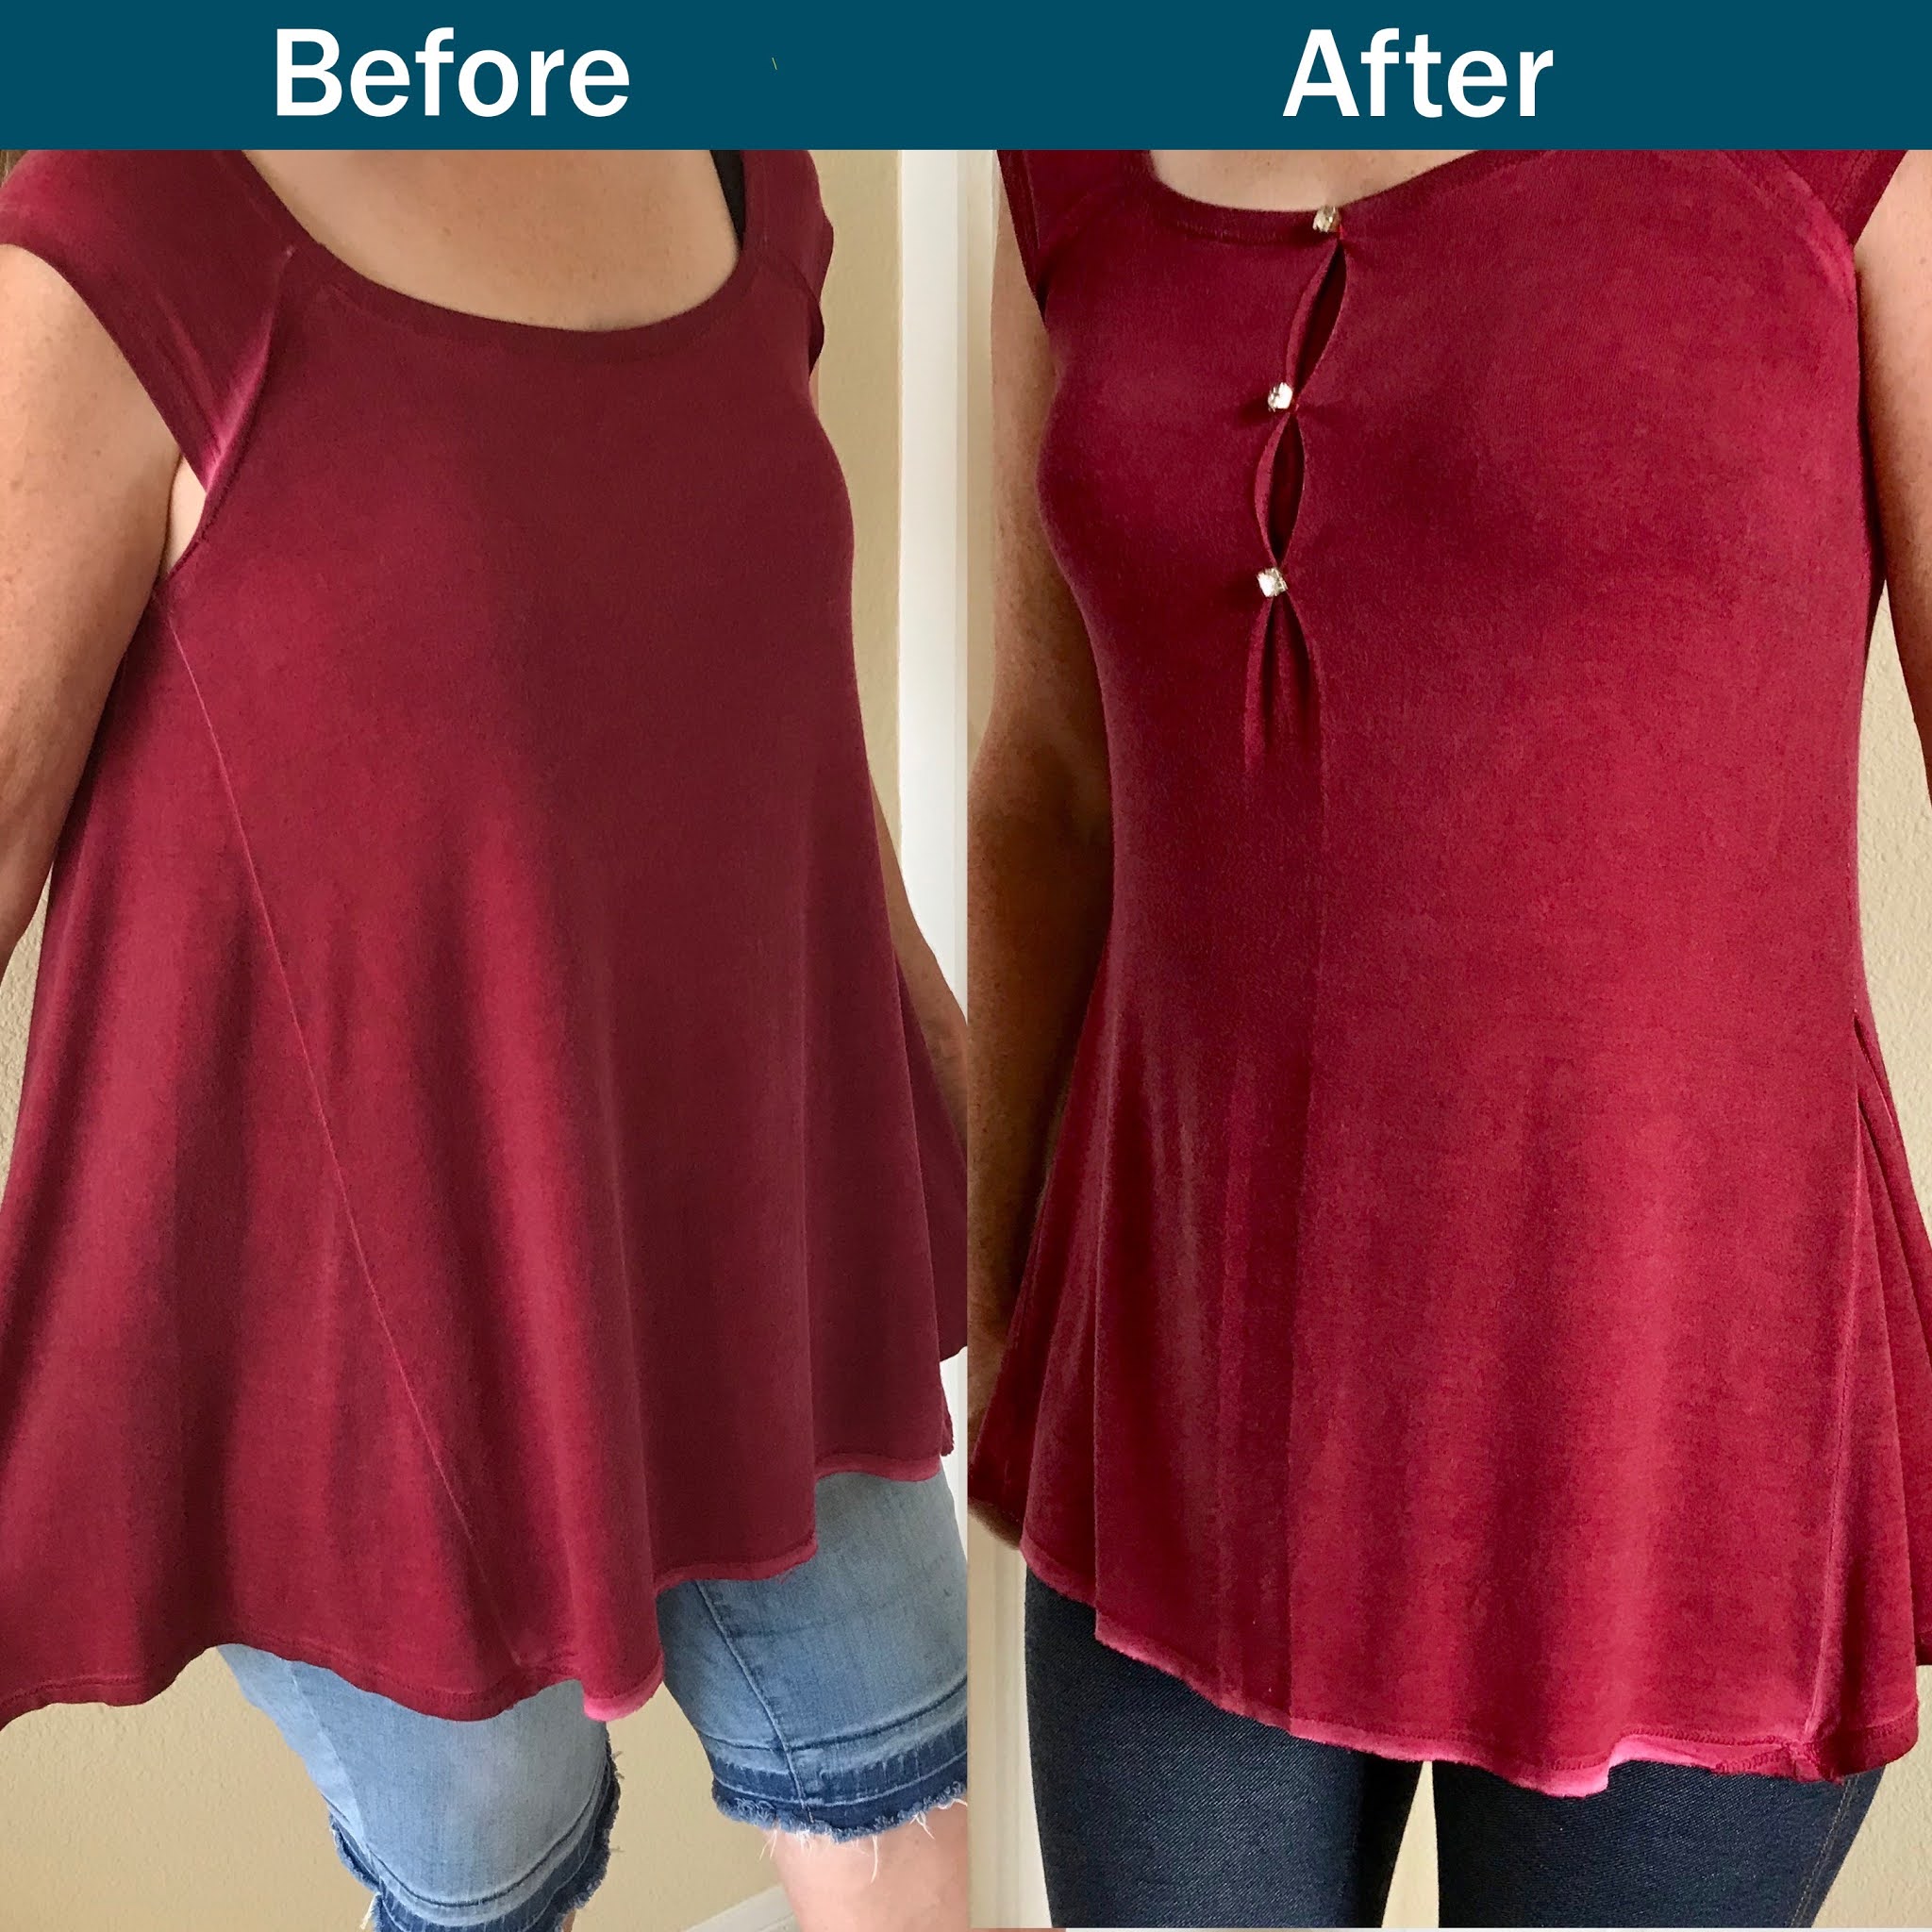
Before and after pictures of a deep red top that is first shown too wide and then shown as more fitted.

Adding an Inverted Pleat to a Top that's too Wide

This top is too wide and flares out too far for my liking. I'm going to make this top less wide and a little more fitted by creating an inverted pleat down the center and partially taking in the sides.
 
 
Red top shown as being way too wide.

Way Too Wide

Here is another view of the top. It's way too wide for my liking so I better get to work on making it fit better.

 
Center marked on red top with instruction on labels.

Finding the Center of the Top

Find the center of your top. Do this by locating the center of both the top and bottom hem of your shirt. Measure from each side to find the center of the top, bottom and center sections of your shirt. Fold your shirt in half and then make a center crease from the top to the bottom by pressing it with an iron.
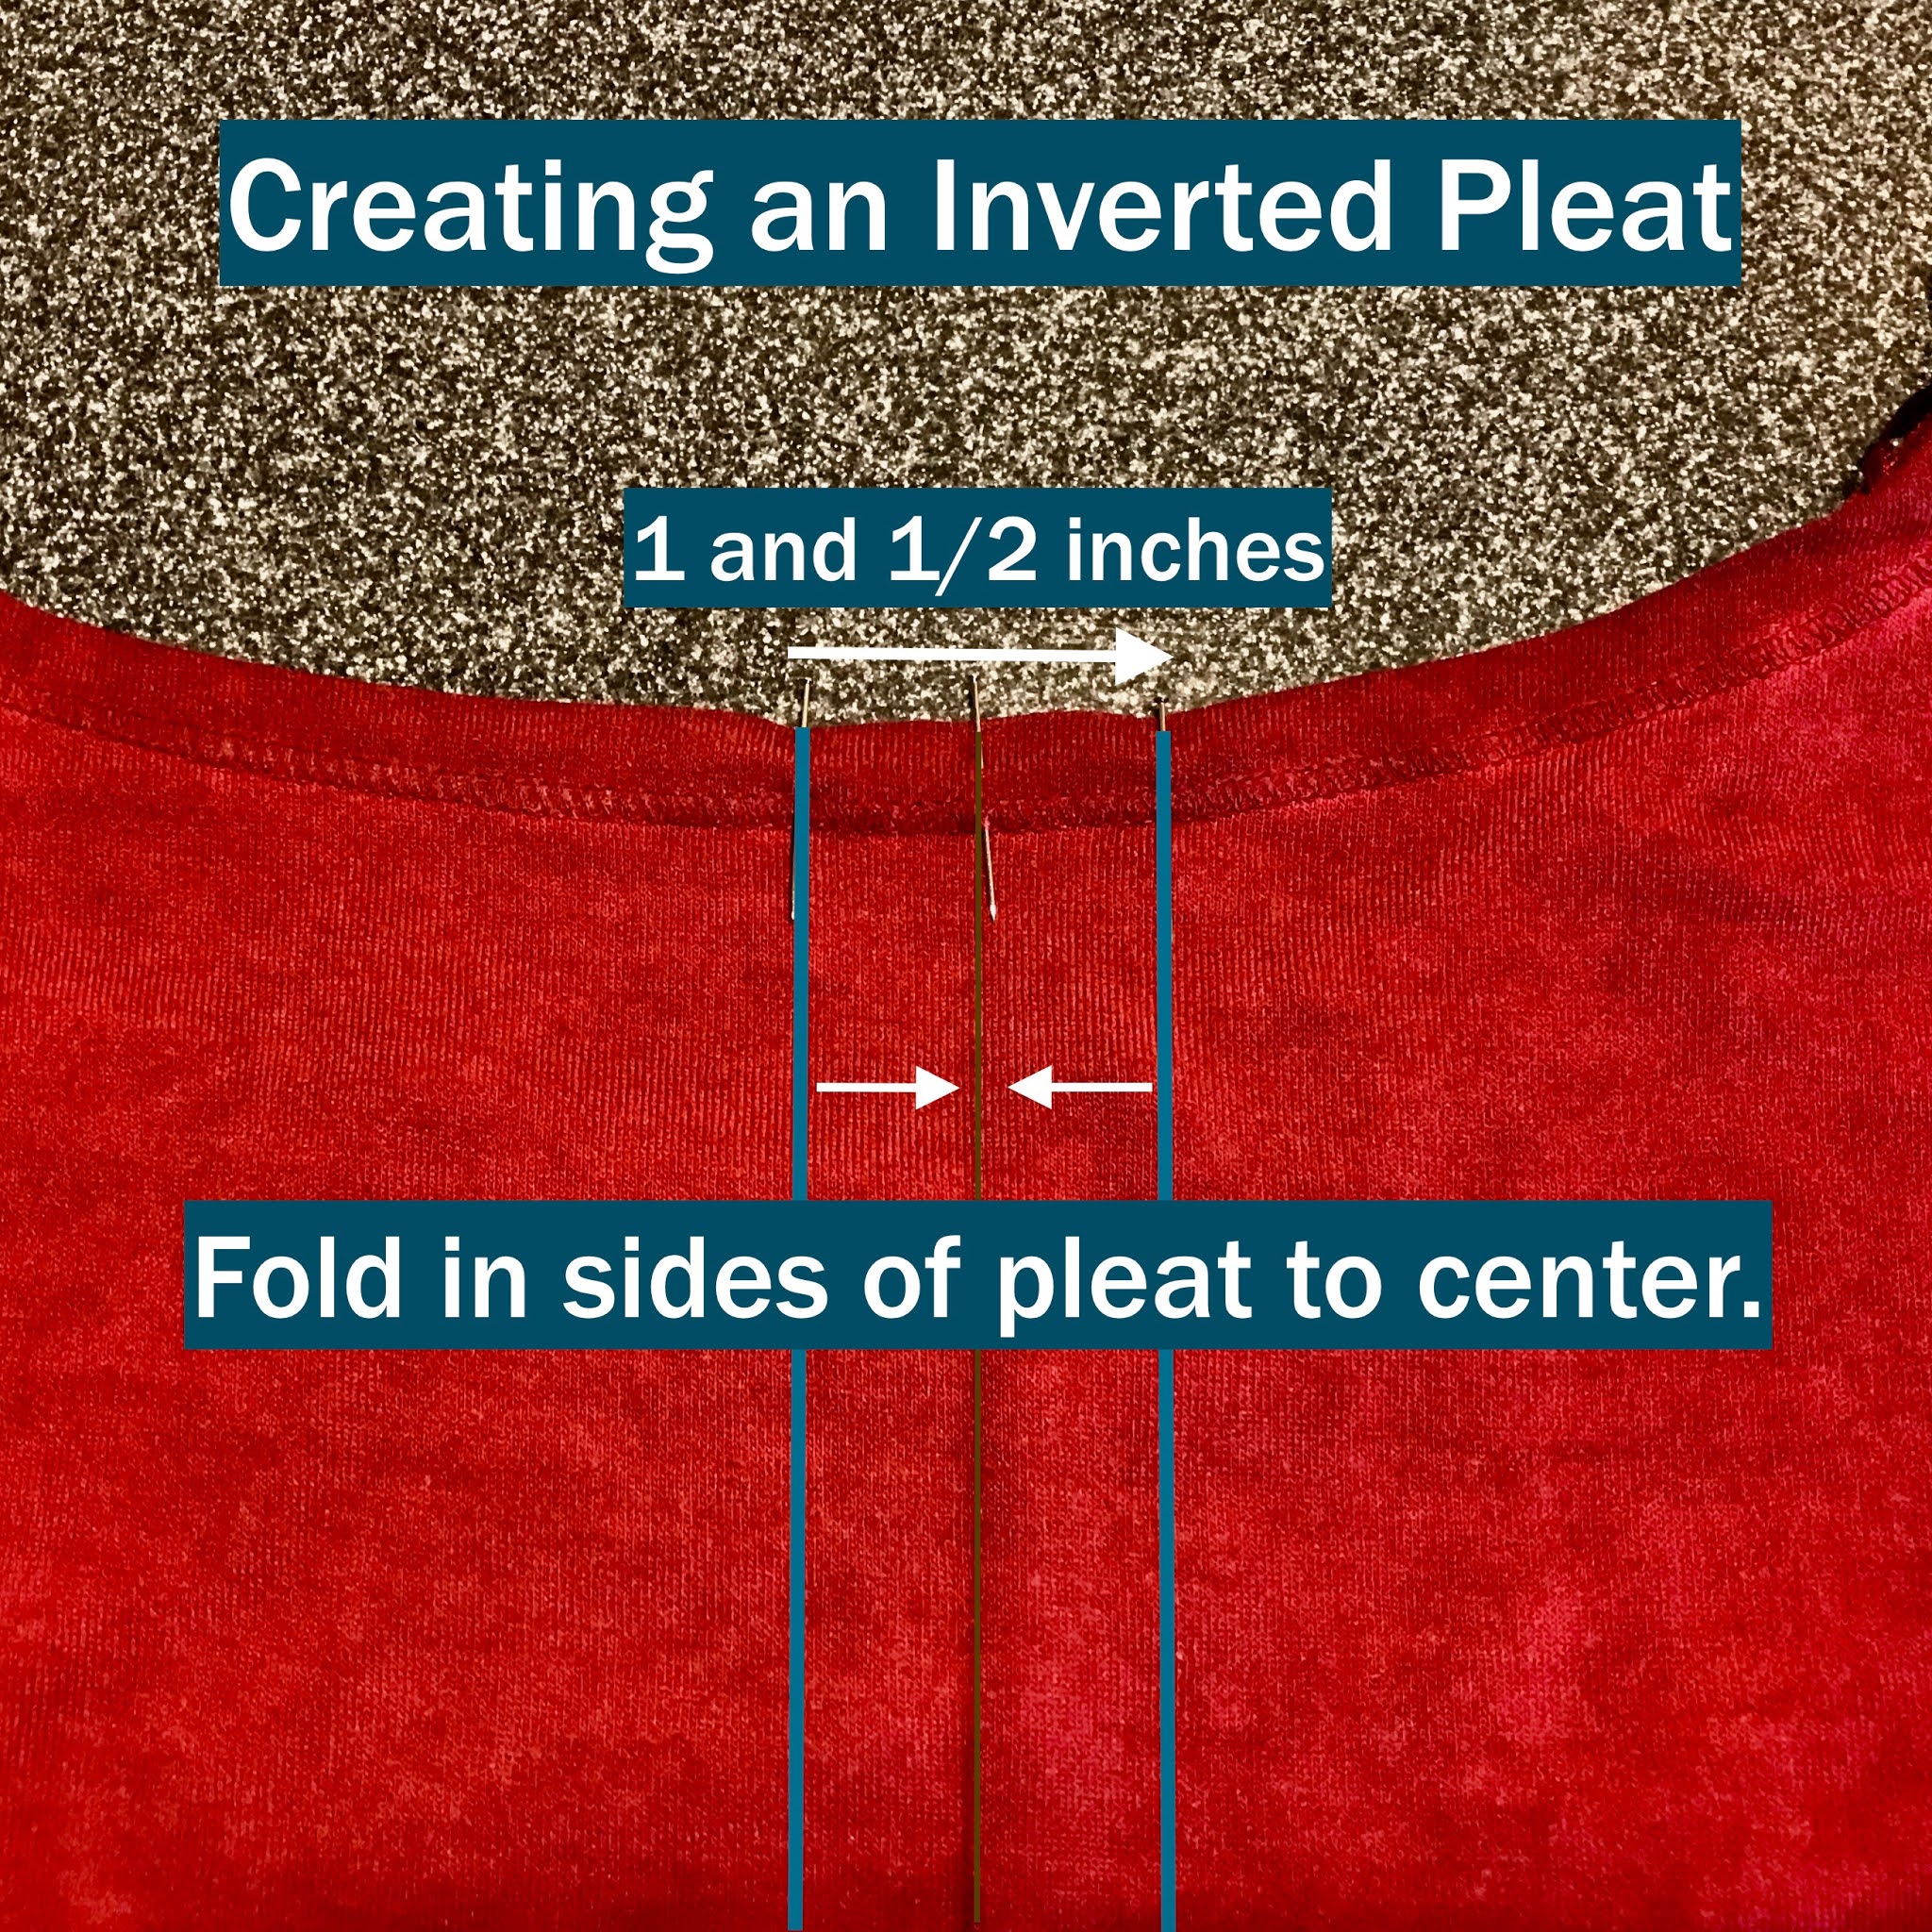
 
 
Red top shown with instructions to create an inverted pleat down center of top.

Creating an Inverted Pleat

My pleat starts with a total width of 1 and 1/2 inches. Measure and mark your total width out of your desired measurement for your inverted pleat. Take the sides of your pleat measurements and fold those sides to the center of your shirt's crease.
 
 
Red top with instructions on folding pleat edges to center.

Folding Pleat Edges to Center

 Take the outside edges of your pleat measurement and fold into the center of your crease and pin. Do this from the top to bottom of your shirt. Iron after pinning to create these two new creases in the center of your top. You have made your inverted pleat!


Red top turned inside out with view of the back of the inverted pleat.

Inverted Pleat View From Inside of Top

 Turn your top inside out and view the back of your newly created inverted pleat. Press with iron on this side too.
 
 
Picture of red top with buttons securing inverted pleat.

Secure Pleat with Buttons

I secured my inverted pleat with these three buttons starting at the very top and then down about one quarter of the top. I sewed the buttons by hand bringing the two edges of the pleat together, securing the pleat and button at the same time. I also sewed through to the back of the pleat to make it even more secure and stable.


Red top with wide sideseams showing and instructions of bringing them together.

Reducing Side Flare

To create less flare on the sides of this top simply bring together the two sideseams that create an upside down V and pin together on the inside of the shirt. Pin together from underarm hole to about 2/3 of the way down the side of the shirt.


Red top with sideseams pinned together.

Outside View of Sideseams Pinned Together


Inside view of sideseams pinned together with instruction labels.

Inside View of Sideseams Pinned Together

Here you can see the sideseams pinned together on the inside of the shirt. Sew sideseams together starting at the top of the seam to about 2/3 of the way down, leaving the bottom section unsewn.


Red top showing completed sideseams.

Sideseams Completed

The sideseams are now complete. These sideseams are another version of the inverted pleat which allows me to bring the extra flare in at the top while allowing the bottom portion to still flare out.


Red top refashioned and completed.

Completed Refashioned Top

Here is the completed refashioned Top. It's a little more form fitted with flare at the bottom. Now I'm able to wear this top without feeling it is way too big. It's also fun to finally finish this refashioned top. Completion is a fun part of the journey! Do you have any projects that an inverted pleat might be useful to enhance with? I would love to hear of your refashion projects and techniques that you love to use.

Enjoy, Linda

Zebra Print Sun Umbrella - Reinforcing A Sun Umbrella with a Fun Zebra Print


Zebra print fabric used to reinforce original sun umbrella.

Zebra Print Sun Umbrella

Here is my new reinforced zebra print sun umbrella. I wanted to fix this particular umbrella instead of buying a new one because this fixture tilts to block the sun; a feature which I love about it. So I decided to use some fun zebra print material that I had to cover the areas that are getting thin and beginning to tear.

A patio umbrella that has begun to tear.
Umbrella Fabric with Tears
Here you can see the original patio umbrella fabric that has the beginning of some tears in it. I used iron on interfacing to reinforce the torn areas.


Interfacing used on tears shown on original umbrella fabric.
Interfacing Used on Tears
Here you can see the iron on interfacing used to reinforce the umbrella fabric.

Zebra print shower curtain material positioned on floor

Zebra Print Shower Curtain Material

Here is the zebra print material that I decided to use to cover the areas of the patio umbrella that are tearing. There wasn't enough material to create a new cover so I decided to use the four corners of the material to create a diagonal cut to cover each of the six sections of the umbrella. Since I only have four corners I used the left over material to construct two more similar cuts.


Zebra material pieced together on umbrella

Zebra Material Pieced Together on Umbrella


Instructions shown on zebra print umbrella for cutting out the shape of the diagonal pieces.

Cutting Out the Shape of the Diagonal Pieces

 I took one corner of the zebra fabric and placed it diagonally on one of the six sections of the umbrella. I placed the point of the corner at the edge of the umbrella in the middle of the section of the triangle (see picture above). Then I cut the fabric on the edges of the triangle adding an extra 5/8 inch of material for seam allowance (see picture above). I did this four times. With the material I had left over I created two more corner pieces. I used one of the original corner pieces as a pattern to create the last two pieces. Then I sewed all the sides together to create the six section cover for the umbrella.

New pieces of the zebra print fabric sewn together and displayed.

Pieces Sewn Together

Here are the pieces sewn together and folded in half.
Open up and place all sewn pieces onto the umbrella. Align all the triangle side seams with the original umbrella fabric side seams which also align with the aluminum extensions.

Instructions on how and where to sew the new fabric on to the original umbrella

Sewing the New Fabric on to the Original Umbrella

I hand stitched the zebra fabric to the original umbrella fabric all around the edge of the zebra fabric. I also hand stitched the two fabrics together around the top circular opening of the umbrella. At the top of the umbrella cut a circular piece of fabric larger than the opening and cover this area. Attach at side seams.


Finished reinforced sun umbrella with zebra print fabric.

Finished Patio Umbrella

Here is my newly reinforced, fun zebra print, sun umbrella that I can tilt when needed. I think I'll go out to the garden now and enjoy!

Linda

Top too Short? Add a Flounce


A red paisley print top with an added beige flounce

Add a Flounce to a Top

I will show you how to add a pre-made flounce to a top. I'm using a pre-made flounce which makes this project easier to do.


A red paisley top that is too short for me to wear.

Adding a Flounce to a Top that's too Short

 This top is shorter than I like to wear, so I'm going to make it longer by adding a flounce to it.


A beige top with a flounce attached

A Pre-made Flounce

Here is a top with a flounce attached. This top does not fit me so I will use this flounce on my other top that does fit.


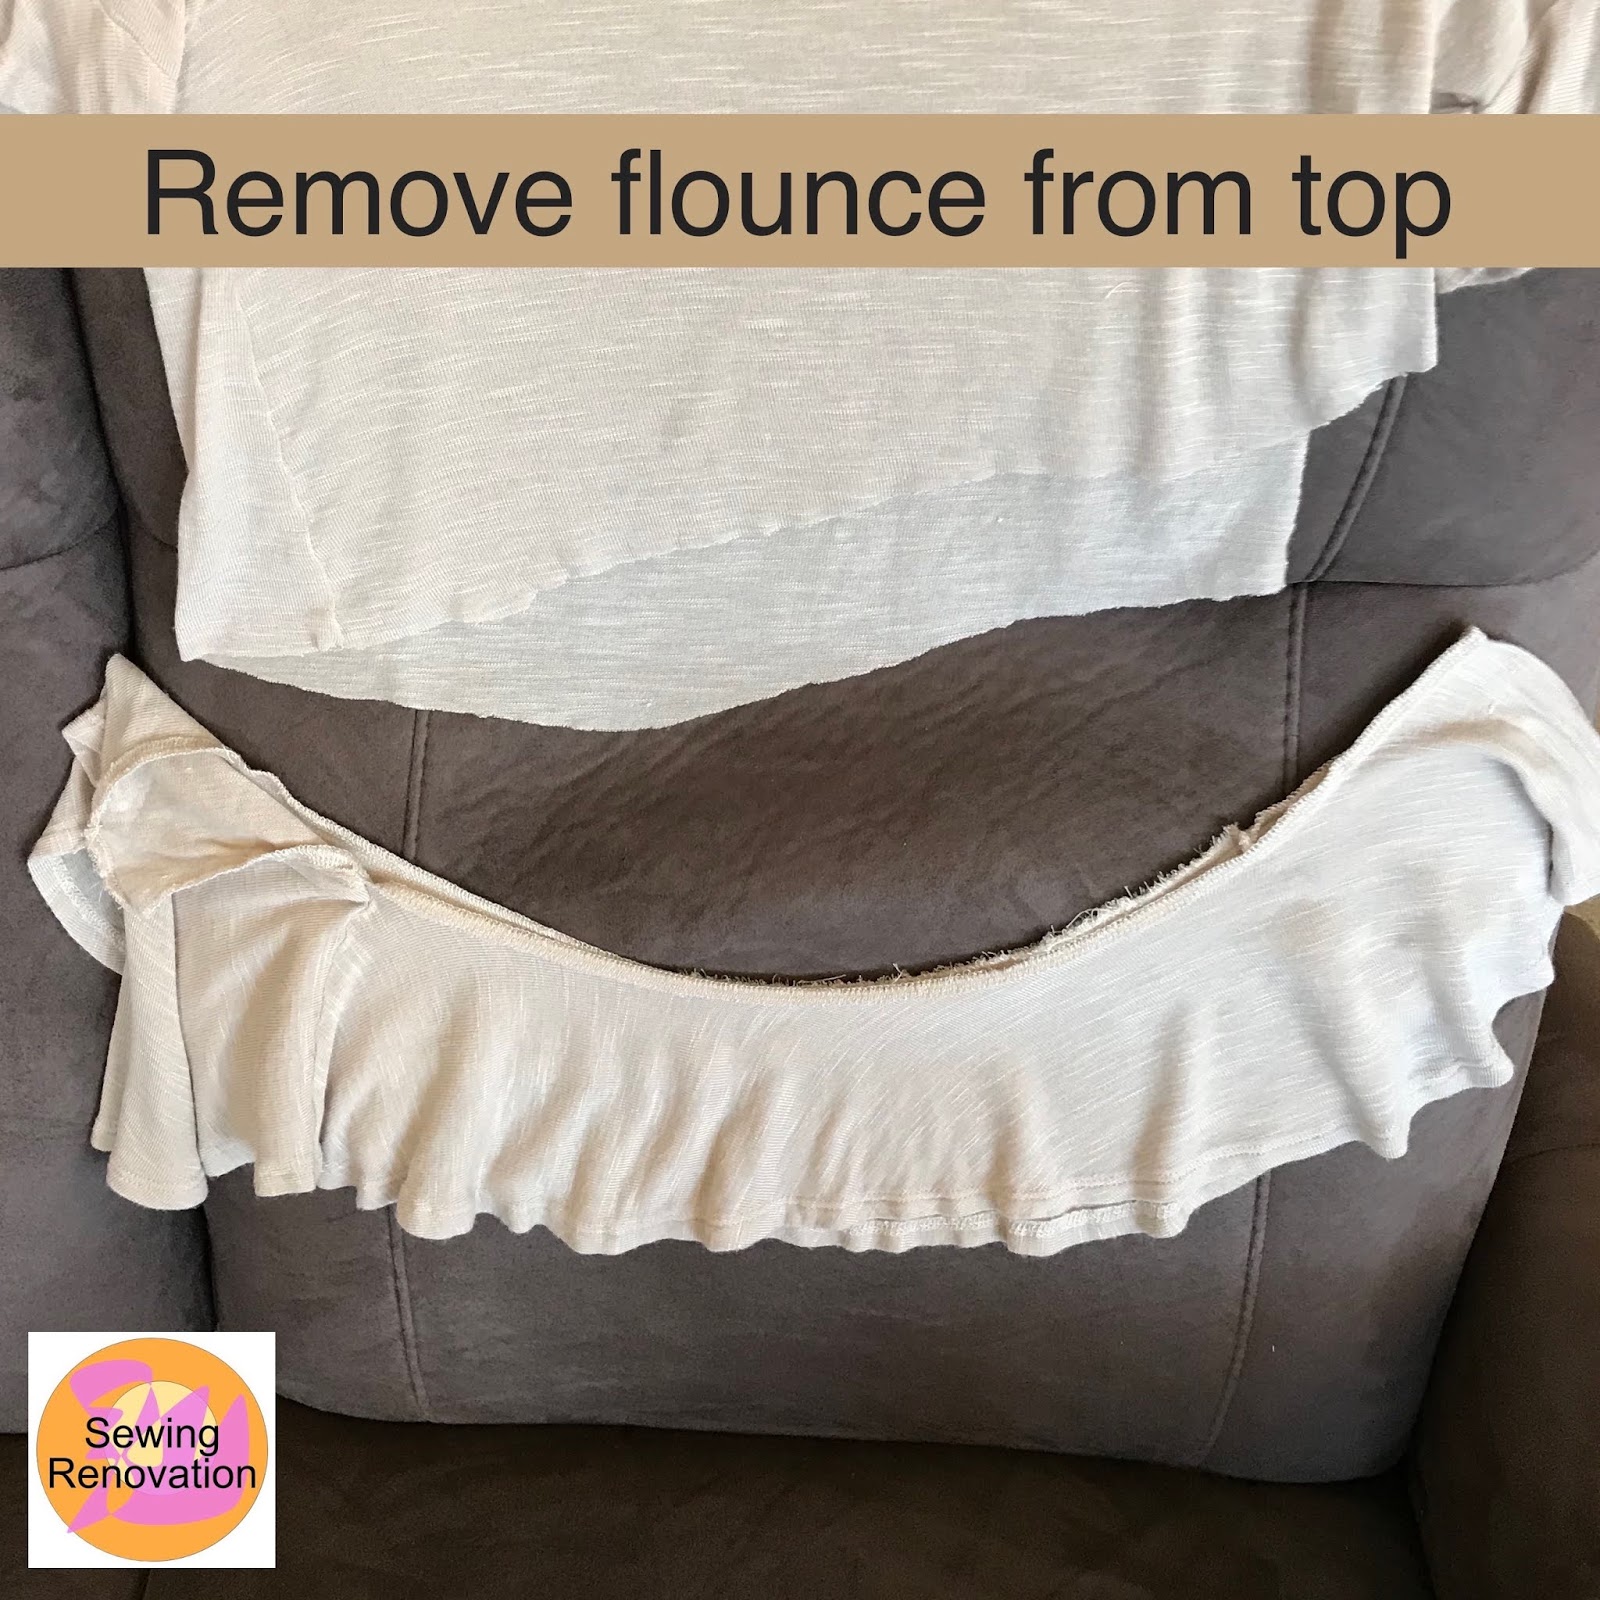
Beige top shown with flounce removed from it and shown below it.

Remove Flounce From Top

Carefully remove flounce from top with a seam ripper.


Beige flounce shown with reinforced inner edge

Flounce with Reinforced Edge

So this pre-made flounce comes with the added benefit of still having this reinforced center edge. I was able to save this edge and attach it to the bottom of my top. If your flounce is not reinforced here you might want to do a simple basting stitch so your material will not stretch too much when you pin it to your top. This pre-made flounce also comes with a hem already in place.


Red paisley top and unattached beige flounce

Top and Flounce


Red paisley top displayed on top of beige circular flounce fully opened

Full Flounce

Here is the full circular flounce opened up. As you can see there is more than you need here. Decide which section of the flounce will work best for your top. I measured how much I needed at the bottom of my top and cut away the edges that were too narrow or too wide.


Flounce Cut to Size

Here is the flounce cut to the correct size for adding to the bottom of your top. I have left some additional material on the edge that is still open to allow for a seam. Now turn your top and flounce inside out.


Red top turned inside out and beige flounce also turned inside out and pinned to bottom of top with arrows pointing to side seam and hem overlap.

Pinning Flounce to Bottom of Top

Top and flounce are turned inside out. The flounce is attached to the bottom of the top. Match side seams of flounce to side seams of top. If you do not have 2 side seams then this is not necessary. You will most likely have one side seam when you bring the flounce edges together. Place flounce edge approximately 1 inch above the hem line of the top. This measurement may vary depending on your top hem line and desired length.


Red paisley top and beige flounce attached and matching at side seams.

Matching Side Seams

Make sure to match up side seams of both the top and the flounce.


Bringing edges of beige flounce together at the red top's side seams

Bringing Together Edges of Flounce

To finish the side seam that is still open, bring edges of flounce together at the top's side seam.


Matching the beige flounce side seam with the red top side seam.

Pin at Side Seam

Pin the top edge of the flounce to the red top's side seam. Now bring the other edge of the flounce to match the same side seam and with right sides of the flounce facing each other pin the flounce together.


Showing how to flare out the side seam of the flounce to keep the shape consistent

Pinning the Flounce Edges Together

Pin the flounce edges together making sure that you have the right sides facing each other. Pin from top of flounce down to the hem seam. Flare out the pins to create the seam line to keep the flounce shape consistent.


Flounce pinned and being sewn on sewing machine

Sew Seam

Sew seam, removing pins before you sew the area.


Completed flounce sideseam.

Completed Seam


Red top and beige flounce pinned together and ready to sew.

Flounce is Pinned and Ready to Sew

Now all the little details are done and you are ready to sew your flounce onto your top. Turn your top right side out.


Red paisley top and beige flounce shown with a ruler for measuring length

Adjusting the Length

Note: My pre-made flounce varied a little from the inner edge of the flounce to the hem of the flounce. After pinning the flounce to the top I used a ruler to see where the length varied and then adjusted the flounce by raising or lowering it at the sewing line.


Sewing red paisley top to beige flounce

Sew

Here is the top and flounce turned right side out. I am sewing on top of the bottom hem seam line of the top. Sew all around the circumference of the top.


Inside view of attached beige flounce to red top.

Attached Flounce

Here is the attached sewn flounce viewed from the inside of the garment.


Red paisley top with beige flounce attached and completed

Finished Flounce!


Completed red paisley top with beige flounce

Completed Top with Flounce

Now my top is not too short anymore and not only has added length, but also added creativity and style with a soft flow to it.

Enjoy, 

🌹Linda

Creative Sewing Renovation Ideas